To deploy a web server, you need to get your application on to a computer that is connected to the Internet with a stable IP address. In the bad old days of the Web, this was done by renting rack space in a data center and installing your own gear. Since you were buying your own computers, you had to guess how much computing power, memory, and disk storage you might need. If you got it wrong, your computers would either sit idle most of the time, or struggle to keep up with the load. And even if you got it right, you had to buy enough equipment to handle your peak load, even if that occurred for only a few minutes each day.
Starting in the 2000s, several hosting companies developed more flexible alternatives based on virtual machines (VMs). One physical machine could host several VMs, sharing its CPU, memory, storage, and I/O devices via a hypervisor. A virtual machine is like a computer running within another computer. To the developer, each VM feels like a real independent computer; it has a full copy of the operating system, application software, and any other supporting files your server needs. It's also isolated from the other VMs running on the same physical machine. But since virtual machines are virtual and not physical, you can remotely spin-up a new VM within a minute or two, and spin it back down again when it is no longer needed. New VMs can be allocated to any physical machine, so hosting companies are able to more fully utilize their expensive hardware.
As desktop and laptop machines became more powerful, developers realized they could use this same technique to create consistent, isolated development environments on their own computers. Tools like Vagrant made it easy for every developer on the team to spin-up the same Linux VM, with the same versions of the language compiler and database engine, regardless of which host OS they happened to use. VMs also made it easy to work on multiple projects that had conflicting dependencies, as the VMs provided separate isolated environments. For example, if one project required version 1 of some database engine, but another required version 2, you could easily switch between them by spinning down one VM and spinning up another. And since the developers were now working in the same environment as their target production servers, there were less unexpected failures when rolling out new versions to the Web.
This all worked well, but there were a lot of inefficiencies. VMs are quite heavy-weight: each VM includes a full copy of the entire operating system (OS), so the OS is duplicated in memory for each VM, even if all the VMs use the same OS. Spinning up a VM also requires a full operating system startup sequence, which can take a minute or two depending on how busy the physical CPU and I/O devices are.
During the 2000s, several features were added to the Linux kernel that provided similar levels of isolation for multiple applications running on the same operating system. These features enable multiple isolated "containers" within a single OS, each of which has a separate file system, process group, and network stack, just like a VM. But unlike VMs, these containers share the underlying OS, so they have a much smaller memory footprint, and can start/stop almost instantly.
These new kernel features were complex and difficult to use, so in 2013 a new company named Docker released a set of command-line tools that made it far easier to build, run, and manage these containers. Docker became very popular, very quickly, and is now commonly used not only for deployment, but also for running any sort of server software on a development machine.
What is Docker?
At its core, Docker is a technology for running application software in isolated, secure, and reusable containers. A container is like a VM, but much lighter-weight, as it can share the underlying operating system (OS), known as the host OS.
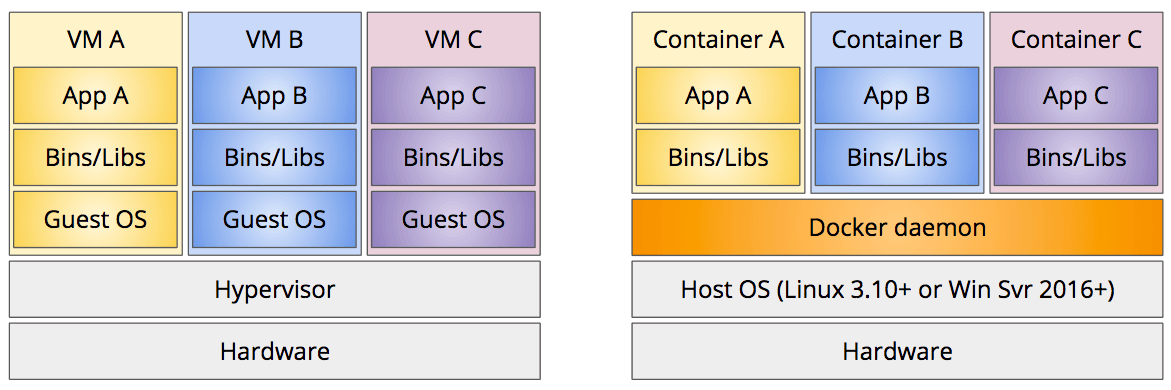
Docker containers are isolated from each other, as well as the host OS. Each container has its own independent file system, so it can't access the host's file system unless you explicitly allow it to do so (see the Mounting Volumes section below). Each container also has its own independent network address and stack by default, and only the ports you want accessible will be published to the host OS. The process groups are also separate and isolated so that a process in one container can't see or communicate with processes in other containers, or the host OS.
All of this isolation is good for not only handling conflicting dependencies, but also security. If a web application gets compromised, the attacker is trapped inside the container and can't do any real damage to the host OS or other containers. Any changes the attacker makes within a running container have no effect on other containers started from the same image. Those changes are also automatically erased when the current container is stopped and removed.
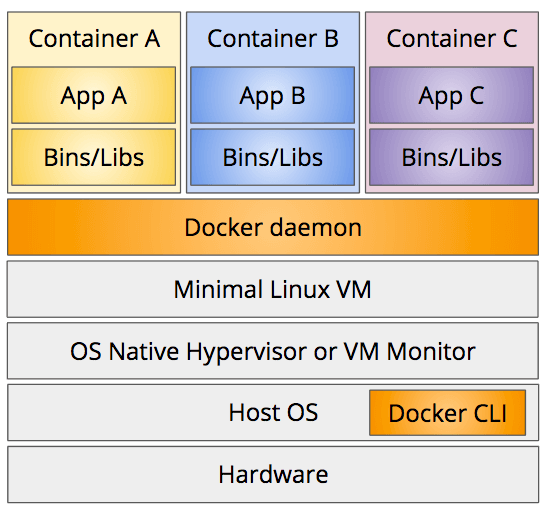
Docker consists of a set of command-line tools and a daemon process that runs on Linux (version 3.10 and beyond) or Windows Server (version 2016 and beyond). The tools just provide a command-line interface (CLI) to the daemon process, so all the real work happens in the daemon.
Since the daemon process requires Linux or Windows Server, using Docker on your Mac or Windows Professional development machine requires a Linux VM. In the early days of Docker you had to install this yourself, but now Docker's native applications for Mac and Windows come with a minimal Linux VM that runs on the native hypervisor built into MacOS and Windows Pro. The command line interface (CLI) still runs on the host operating system, but it communicates with the daemon process running within the Linux VM to do all the work.
Container Images
In addition to leveraging the underlying operating system's containerization features, Docker also defines a standard format for container images. A container image encapsulates all the software and files your application needs to run into one easily-managed unit. A container image is like one of those Meals Ready to Eat that the military gives their troops: everything you need for a given meal, including the fuel to cook it, is all included in one easy-to-carry package.
Docker makes it easy to build your own container images that include whatever executables, libraries, and files your application needs at runtime. Once built, you can run these images with one simple docker run command, and upload them to Docker's central registry known as Docker Hub.
Docker Hub is like GitHub, but for Docker container images instead of git repos (you'll probably notice a lot of similarities between the Docker and git commands—they purposely emulated git). Like GitHub, the free accounts give you unlimited public container images, but only one private container image. You can upgrade your account to get more private image storage.
Also like GitHub, anyone can download and run any public container image on Docker Hub. This makes it easy to not only deploy your own containers to the Web, but also run any of the popular open-source server software that is already on Docker Hub: relational databases engines like MySQL and PostgreSQL; no-SQL distributed data stores like redis, MongoDB, or Cassandra; message queues like RabbitMQ; or full Linux distros like Ubuntu or CentOS.
Installing Docker
To build or run containers, you first need to install Docker on your machine. Like many open-source projects, Docker offers a free "community edition (CE)" as well as an expensive "enterprise edition (EE)" with more features. For this course, and for most open-source work, you only need the free community edition.
Mac and Windows users should install the Docker CE Desktop App for their respective platform:
These desktop apps install a minimal Linux VM for the Docker daemon process, and use your OSs native hypervisor to run it. You communicate with the daemon process using the command line tools, which run on your host OS, and can be used from your normal terminal application.
Note that Windows 10 Home edition doesn't include a native hypervisor, so it can't run the Docker App for Windows. If you are running Windows Home edition, you can upgrade to the Education edition for free while you are a student.
Running Containers
After installing and launching the Docker Desktop App, you can test it by running their "Hello, World!" container image. Use this command:
docker run hello-worldThis command tells Docker to run an instance of the container image named hello-world, which is a container image the Docker developers already built and uploaded to Docker Hub. If you've never run this container image before, or if a newer version of the image is available, the Docker daemon process will automatically download the image from Docker Hub before running it.
After downloading the image, the Docker daemon process then runs a new instance of that container image. You can think of the container image as being like a Java class, while the container instance is like an instance of that class you create in memory. Each container instance is separate from all other instances, but all of them run the same code from the container image.
If all went well, you should see an output like this:
Hello from Docker!
This message shows that your installation appears to be working correctly.

To generate this message, Docker took the following steps:
 1. The Docker client contacted the Docker daemon.
 2. The Docker daemon pulled the "hello-world" image from the Docker Hub.
 3. The Docker daemon created a new container from that image which runs the
    executable that produces the output you are currently reading.
 4. The Docker daemon streamed that output to the Docker client, which sent it
    to your terminal.

To try something more ambitious, you can run an Ubuntu container with:
 $ docker run -it ubuntu bash

Share images, automate workflows, and more with a free Docker ID:
 https://cloud.docker.com/

For more examples and ideas, visit:
 https://docs.docker.com/engine/userguide/
The hello-world container image is just a simple executable that writes this message to the standard out stream. But you didn't have to build that executable, nor have any particular runtime environment installed on your machine to run it (e.g., Python or Node.js interpreter). Everything it needed to run was already inside the container image.
Listing and Inspecting Containers
As soon as the executable finishes, Docker stops the container instance, but the log files and other information related to the container instance are still available. This is handy when something goes wrong, but it also consumes some disk space that you might want to recover.
To see a listing of all containers, including those that are stopped, use this command:
docker ps -aThe listing should show your stopped hello-world container instance, along with the container's unique identifier and automatically-generated name. Note that this automatically-generated name refers to this particular container instance and not the container image the instance is based upon. Since you can run multiple instances of the same container image, Docker assigns a unique name to the instance so that you can refer to it in subsequent commands.
Use either the container ID or the container name with this command to see what the container instance wrote to the standard out stream:
# for example,
# docker logs 09f369706e7b
# docker logs gallant_snyder
docker logs <container ID or name>
By default, Docker captures all text written to the standard out stream into a log file that you can read later. This is very handy when containers encounter and error during startup. You can use this command to see the error and figure out what went wrong.
You can also see every setting Docker used while running the container using the docker inspect command:
docker inspect <container ID or name>This produces quite a lot of output, so you often will want to pipe this through grep, or use the --format flag to specify a formatting template. See the docker inspect documentation for details on this --format flag.
To clean up and delete all of this container information, use the docker rm command:
docker rm <container ID or name>After running this command, all the log files and other information will be deleted, and if you run docker ps -a again, the resulting list should no longer show the hello-world container you ran earlier.
Running Interactive Containers
The hello-world container is just an executable that runs and exits, but other container images give you access to an interactive shell within the running container. For example, if you've ever wanted to run an Ubuntu Linux VM on your development machine, you can do so quite easily with this command:
docker run -it --rm ubuntuAfter downloading the image, Docker will run the container and put you into an interactive bash shell within it. You are now at an Ubuntu Linux command line, running as root. Use ls to list the files, and whoami to echo your user name. Type exit to exit the container's bash shell and return to your host OS shell.
We used two new flags when we ran that container:
- -it means you want an interactive terminal inside the container. Since the default executable for the
ubuntuimage isbash, this connects your terminal to a new interactive bash shell within the container. - --rm means that you want Docker to automatically remove the container when you exit. This is equivalent to immediately running
docker rmafter exiting the container, but avoids the need to figure out the container ID or name.
The ubuntu image includes only the core operating system, so many of the commonly-used Unix commands are not already installed. This image is designed to act as a base for your own container images, so it is purposely lean and mean. You can use the apt command to install other commands, but there is another container image that already has all the commands you probably need, plus a really cool name: BusyBox.
docker run -it --rm busyboxBusyBox is known as the "Swiss Army Knife of Embedded Linux." It's actually not a full Linux distro, but is instead one relatively small executable that can emulate a bash shell and most of the commonly-used Linux commands. It occupies about 1MB on disk, so it downloads very quickly, and is small enough to be used in many kids of embedded systems.
After stating a BusyBox container, try using the the nc command as described in the HTTP tutorial. To see a full list of commands supported, execute the busybox command.
Running Detached Containers
Docker can also run containers that are meant to continue running in the background, such as web servers and database servers. These are known as detached containers because your host OS terminal is not attached to the process running within the container. Once these containers are started, your terminal returns to your host OS prompt, but the container keeps running in the background, ready to process requests. To run a detached container, we add the -d flag to the docker run command.
Since these sort of containers commonly respond to network requests, and since Docker containers are completely isolated from the host network by default, we also need to explicitly tell Docker to publish ports from the container to the host OS. This makes it possible to send a network request into the container from the host OS and receive a response. This publishing of ports is done using the -p flag on the docker run command.
For example, to run the popular NGINX web server as a detached container, and publish port 80 in the container to port 80 on the host, use this command:
docker run -d -p 80:80 --name mynginx nginxYou can publish multiple ports by including multiple -p flags. For example, to publish ports 80 and 443, use -p 80:80 -p 443:443. If you don't publish any ports, the container won't be reachable from the host OS, nor any client that communicates with the host OS.
Here we also added the --name mynginx flag, which assigns a particular name to the container instance instead of letting Docker generate a random one. This will make it easier for us to stop and remove the container later.
The docker run command will respond by printing just the new container ID (long form) and then return you to your host OS prompt. But the container is still running. To verify this, run the docker ps command
docker psYou should see your mynginx container in the list.
Since we published port 80 within the container to port 80 on the host, you can also request the web server's home page by clicking this link: http://localhost. Your web browser will make an HTTP request to port 80 on your Host OS, Docker will forward that into the container, and the NGINX web server inside the container will process the request by returning its default home page.
To stop and remove the container use the docker stop and docker rm commands:
docker stop mynginx
docker rm mynginx
Since these commands are often invoked together, Docker also provides a handy shortcut that does both. Just include the -f flag when running docker rm to force the container to stop before removing it:
docker rm -f mynginxMounting Volumes
By default, a Docker container has a completely separate and isolated file system from the host. The container can't read the host files, nor modify them. But there are times when you do want a container to at least read files on the host. For example, say you want to run the NGINX web server container, but let it read the web client files you are working on in the current directory as the default web site. To enable this, you can use the -v flag to mount a directory from the host OS as a new volume within the container's file system. For example:
docker run -d \
-p 80:80 \
--name mynginx \
-v /Users/dave/mywebsite:/usr/share/nginx/html:ro \
nginx
Since the number of flags is now getting large, I've switched to using a multi-line bash command. If you end a line with \, bash will treat the next line a continuation of the same command. But be careful not to include a space after the \. That will be interpreted as the end of the command, and the \ will be treated as a command argument. The line must end with the \ character in order for the continuation to work.
As before, we use the -d flag to run the container detached, -p to publish port 80, and --name to provide a specific container name. But we add a -v flag, whose value should be in this form:
-v /host/file/path:/container/file/path:roThe first part of the value is the absolute path of the directory on your host that you want to expose inside the container. The second part (after the :) is the path inside the container's file system where you want that directory tree to appear. The :ro on the end stands for "read-only." Using this ensures that code running inside the container can't make changes to the files on the host.
For example, the value /Users/dave/mywebsite:/usr/share/nginx/html:ro will make the host directory /Users/dave/mywebsite available inside the container at the path /usr/share/nginx/html. So the host file /Users/dave/mywebsite/index.html will appear inside the container at /usr/share/nginx/html/index.html. That is the path where NGINX looks for the site's home page.
When you mount a volume, the path inside the container can be an existing path or a new one. If it's an existing path, Docker effectively replaces the files that were already in the container at that path with the files from your mounted directory.
As you change the files on your host, Docker also ensures that the files inside the container are updated accordingly. Thus you can work on your web site files in your favorite graphical editor on the host, and your saved changes will be visible immediately to the NGINX server running inside the container.
Just as with port publishing, you can mount multiple volumes by specifying multiple -v flags.
The host path must be an absolute path, but if you're on a Mac or Unix system, or if you are running the Windows 10 bash subsystem, you can use a neat bash completion trick to refer to the current directory. The pwd command will return an absolute path for the current directory, and the syntax $(pwd) will expand to be the result of the pwd command. So to mount the current directory into the container at /usr/share/nginx/html you can change the -v flag to be like this:
# mount current directory into container
-v $(pwd):/usr/share/nginx/html:ro
Setting Environment Variables
Docker containers are isolated not only from the host's file system, but also from the host's environment variables. A newly-run container can't see any environment variables defined in your host shell, but you can use the -e flag on the docker run command to set environment variables that the container can see.
For example, to set the variable MY_ENV inside the container, the command would look like this:
docker run \
-e MY_ENV='some value' \
... rest of flags and image name ...
The code running inside the container will then be able to read the environment variable MY_ENV to get its value.
If you want to forward an environment variable that you've already declared in your shell into the container, you can use the -e flag and use bash completion to set the value. For example:
docker run \
-e ADDR=$ADDR \
... rest of flags and image name ...
Here we add an environment variable named ADDR inside the container, and set its value to the current value of the ADDR environment variable in our host shell. Remember that adding a $ in front will cause bash to replace that expression with the current value of the environment variable.
Building Your Own Container Images
A mounted volume is useful whenever you need code running inside a container to read files on the host's file system, but if those files won't be changing once they are in production, it makes more sense to just build a new container image and copy the files into it. For example, you can build a new container image based on the NGINX container image, and just copy your web site's files into the /usr/share/nginx/html directory. That way, your web site files are already in the container image, and you can deploy the site to any server using a simple docker run command.
Follow along by creating a directory containing a simple HTML page, with perhaps some images and CSS. We will build a new container image, based on the NGINX image, and copy these files into it. Before proceeding, create a free DockerHub account if you haven't done so already.
The Dockerfile
To describe your new container image, you need to create a file literally named Dockerfile (no extension) in the directory containing your web site files, or above it. The Docker CLI will compress the entire directory tree under this Dockerfile and send it to the Docker daemon process for building, so any files you want to include in the new image must be in the same directory or below the Dockerfile.
A Dockerfile is a plain text file that describes a recipe for the new container image. Each line of the file specifies another step in the recipe. The first step is always a FROM instruction:
FROM nginxThe FROM instruction specifies which container image you want to build upon. Here we are using nginx because we want everything that was in the nginx container image, plus our web site files. You can build upon any container image on your system or Docker Hub. If you want to start from scratch instead, use the scratch image, which contains nothing.
NOTE: Always double-check the spelling of the
FROMimage. There is nothing preventing an attacker from creating a new container image namednginexorenginexthat builds upon the legitimatenginximage, but adds some malicious code that is executed when the container runs. If you build upon one of these malicious containers, your container will be compromised from the start. This style of attack is essentially a form of "typosquatting" and it has become increasingly common on public code registries like NPM.
The next step in our container image recipe is to copy our web site files into the container, at the directory where NGINX looks for the web site files (/usr/share/nginx/html). This is done using the COPY instruction:
COPY . /usr/share/nginx/htmlThis is just like the cp command in bash: the first argument is a relative source file path on the host file system, and the second is an absolute target file path in the container's file system. Here we use . for the relative source path, which means "the current directory." If your web site files are stored in a sub-directory, you would name that subdirectory instead:
# e.g., if your production files are in a `build` sub-directory...
COPY build /usr/share/nginx/html
Those two recipe steps are all we need for this example. After you save this file, you can build the container image using this command, replacing your-dockerhub-name with your Docker Hub user name:
# note the `.` on the end, which specifies the current
# directory as the location of the Dockerfile
docker build -t your-dockerhub-name/examplewebsite .
The -t flag specifies the name you want to give this new image. Like GitHub repos, this should be in the form your-dockerhub-username/your-image-name.
The . on the end tells Docker that the Dockerfile, as well as all other files it references, are in the current directory or below. The docker build command actually compresses this entire directory tree and sends it to the Docker daemon for building, so you can only refer to files in this directory tree.
Docker will show several messages as it builds your new container image. Docker container images are actually comprised of one or more layers, and each line in your Dockerfile defines a new layer. Docker will reuse the existing layers from the NGINX image, but create a new one corresponding to your COPY command. When you rebuild the container image, it will only rebuild this new layer, and only if the source files you are copying have changed. This makes Docker image rebuilds very fast.
If all went well, you should be able to run your new image using this command, replacing your-dockerhub-name with your Docker Hub user name:
docker run -d -p 80:80 --name exsite your-dockerhub-name/examplewebsiteAfter it starts, use docker ps to ensure that it's running, and request http://localhost to see your web site in the browser. If you see the default NGINX home page instead of the home page you copied into the container image, you may need to do a hard refresh (Cmd+Shift+R on Mac, Ctrl+F5 on Windows) to force your browser fetch the home page from the server instead of its local cache.
To stop and remove this container, use this command:
docker rm -f exsitePushing Containers to Docker Hub
If you want to share this container with others, or deploy it to a VM in a cloud infrastructure like AWS or DigitalOcean, you can now push this new container image to your DockerHub account.
Before you can push new images to Docker Hub, you must authenticate. You only need to do this once on any given machine:
docker loginAfter you successfully authenticate, you can now push a new container image using the docker push command. This command takes the name of the image you want to push, which we specified in the previous section. Remember to replace your-dockerhub-name with your Docker Hub user name.
docker push your-dockerhub-name/examplewebsiteAfter it successfully pushes, you should be able to visit https://hub.docker.com/ and see your new container image listed there. Since it's public, you can now easily pull that image and run it on any other machine, including a VM running in a cloud infrastructure, using the same docker run command you used to run the container on your development machine. Docker will automatically pull the image from Docker Hub if it doesn't already exist on the target machine.
Just as with GitHub, if you update a container image on Docker Hub from your development machine, you must pull that newly-updated image to any other machine that previously pulled the image. Use the docker pull command to pull the updated image:
docker pull your-dockerhub-name/examplewebsiteContainer Image Versioning
When you build your container the -t flag assigns a name (formally known as a "tag", hence the -t) to your container image. That name can be any string, but by convention we use the creator's Docker Hub name and the container image name, separated by a slash. That way multiple Docker Hub users can all create images named examplewebsite and they won't conflict, because they are prefixed with the creator's Docker Hub name (which must be unique).
But each time you rebuild and push your-dockerhub-name/examplewebsite, it overwrites the previous container image on Docker Hub. If you want to keep older versions around, just add a version number to the end of the tag. By convention, we use : to separate the container name from a version number. For example, version 1.0 of our container would be tagged as your-dockerhub-name/examplewebsite:1.0 while version 2.0 would be tagged as your-dockerhub-name/examplewebsite:2.0. Developer can then choose which version to run by specifying the different tag names in the docker run command. By convention, developers tag the most recent version of the container image with the base name (your-dockerhub-name/examplewebsite) so that those who just want the most recent version, whatever that happens to be, have a stable name to use.
Containers for Go Web Servers
In the previous example, we built a container image that uses the NGINX web server to serve static files. A Go web application is its own web server, so we don't need NGINX. In fact, we really don't need anything beyond the built Go executable, unless that executable needs other files to run.
But Docker containers run on Linux, and Go fully compiles programs down to machine code for a particular chip architecture and operating system, so our Go executable needs to be compiled for Linux before it goes into a new container image. Thankfully, Go support cross-compilation, meaning it can build a Linux executable from a Mac or Windows machine.
To make a Linux build of your Go executable, set the GOOS environment variable while executing the go build command in your project directory. You can do this in one line, like so:
GOOS=linux go buildThis sets the GOOS environment variable only for this one go build command. After that command completes, the environment variable will no longer be set.
This build will take a bit more time than normal because it has to re-compile and statically link all off the standard library packages your application uses so that they will work properly on Linux. After it's done, there will be a new executable in the current directory that is built to run on Linux.
If your Go web application doesn't need any additional Unix commands or files, you can use the scratch image as the base:
FROM scratch
COPY mygoapp /mygoapp
This Dockerfile starts a recipe using the scratch container as the base (which is empty) and then copies the built Linux executable into the container. To complete this recipe, we need to add two more steps:
EXPOSE 80
ENTRYPOINT ["/mygoapp"]
The EXPOSE instruction tells Docker that your Go web application will try to listen on port 80 when it runs. This is just informational: you still need to use the -p flag to publish this port when running the container, as Docker won't publish ports automatically for security reasons. But Docker will refer to this EXPOSE information if you use the -P flag instead. The capital -P flag will publish all ports mentioned in EXPOSE commands, but map them to randomly-selected unused port numbers on the host. To discover which port number Docker chose, you have to run the docker ps command. The -P flag is useful when running many containers that all expose the same port number, and you want Docker to find an open port on the host to map each of them to.
The ENTRYPOINT instruction tells Docker what program to execute when the container runs. Since the scratch image is empty it has no defined entry point, so we need to tell Docker which program to run when the container starts. That should be the Go application we copied into the container image.
You might be wondering why we didn't need to include the EXPOSE and ENTRYPOINT instructions in the previous Dockerfile based on NGINX. Because we used the nginx image as the base, we effectively inherited the EXPOSE and ENTRYPOINT instructions from that image. We could override those in our image if we needed to, but there was no need to in this case.
The scratch image is fine if your Go web application doesn't need to reference any standard Unix commands or files, but sometimes you will need those. For example, if your Go web application needs to fetch https:// URLs, it needs access to the system root CA certificates in order to verify the site's TLS certificate. Or if it needs to invoke other standard Unix commands, those need to be present on the system.
In this case, a good base image to use is alpine, which is the official image for the minimal Alpine Linux. Alpine is based on BusyBox, but adds a package manager so we can install any additional commands and files we need. For example, to install the root CA certificates, we can use this sort of Dockerfile:
FROM alpine
RUN apk add --no-cache ca-certificates
COPY mygoapp /mygoapp
EXPOSE 80
ENTRYPOINT ["/mygoapp"]
Here we add the RUN instruction, which will cause the Docker daemon to run the command that follows inside the new container as it builds the image. The apk command is the package manager for Alpine, and here we use it to add the ca-certificates package to the container image. The --no-cache flag tells the package manager not to cache the entire index of available packages, as that would just consume a lot of unnecessary space in the container image.
The apk add command can install many packages at the same time. If you need multiple packages, just add them to the end with a space in between each package name (e.g., ca-certificates git curl). But install only those packages you will actually need: each package increases the size of your Docker container image.
The .dockerignore File
As noted earlier, the docker build command actually compresses the entire directory tree and sends that to the Docker daemon for building. If you want to omit files or directories from this compressed tree, add a .dockerignore file to the directory, and list all paths you want the docker build command to ignore. The format of this file is just like the .gitignore file.
You will commonly want to use this when creating a Docker container image for a Node.js application, as the contents of the node_modules directory on your host OS should be ignored.
Cleaning Up
One thing you will notice quickly is that Docker doesn't delete previous versions of your container images when you rebuild the image. Instead it leaves them on your disk in an "untagged" state. These are often referred to as "dangling images," and they consume disk space, so you will eventually want to delete them.
The docker rmi command will delete images, but it requires a list of image IDs to delete. If you don't know what those IDs are, or have several you need to delete, you can use a relatively new command to delete all of them at once:
docker image pruneThis will prompt you to confirm that you want to delete them. If you want to bypass the prompt and just delete them, add the -f or --force flag:
docker image prune -fYou can use a similar command to remove all stopped containers:
docker container prune -f If you want to just cleanup everything that is not currently in-use, use this command:
docker system prune -fFor more details on these pruning commands, see Prune unused Docker objects in the Docker documentation.