Now that you know how to build your own Docker containers, it's now time to learn how you can deploy those to a VM running in the cloud. This tutorial describes how to deploy to DigitalOcean, which is a cloud hosting service that offers reasonable pricing, a clean and easy-to-use UI, superb tutorials, and a powerful API.
DigitalOcean offers only a few core services, so it's much simpler than Amazon Web Services (AWS). Their primary service is virtual machines, which they call "droplets" (a droplet in the vast digital ocean...get it?). They also offer load balancers and general blob storage, but that's about it. Although they have a limited number of services, those services are relatively cheap: their entry-level droplets are only $5/month.
If you don't already have a DigitalOcean account, sign-up for one before proceeding. If you are taking INFO 344, contact your TA for a promo code that you can use to get enough credit to cover the costs related to the assignments.
Generating and Registering SSH Keys
When you create a VM in any cloud infrastructure, you need a way to connect to it via ssh as a user with administrator privileges so that you can perform administrative tasks. SSH stands for "secure shell," and to be secure, it needs to authenticate you and encrypt communications between your development machine and the server. SSH can do that in one of two ways: you can supply the root user's password (not recommended); or you create and setup SSH keys (recommended).
SSH keys are private/public key pairs, similar to the ones used in TLS. You can generate this key pair on your development machine, and add the public key to any new droplet you create. When you connect, the ssh command uses your private key (which remains on your development machine only) to encrypt a message, and the droplet uses your public key to verify that message. Since you should be the only person in possession of your private key, it knows that you are you, and the authentication succeeds.
Generate a Key Pair
To see if you already have an SSH key pair generated, use this command:
ls ~/.sshIf you see files named id_rsa and id_rsa.pub, you already have a key pair and you can skip to the next section.
If you get a "no such file or directory" error, or if you don't see any files listed, you don't have a key pair generated yet. Use this command to generate one:
ssh-keygen -t rsaYou will be prompted as to whether you want to add a passphrase to the private key. This is an added security measure you may want to use, but beware that you'll have to type this passphrase every time you use the key. Enter the passphrase, or just hit return to use no passphrase.
You'll see some output telling you where the new "identification" (private key) and public key files were saved. Now we need to register the public key with our DigitalOcean account.
Register your Public Key
After signing up for an account (or signing in to an existing one), click on your Avatar in the top right corner and choose "Settings" from the drop-down menu. Then click on the "Security" link in the left-side navigation area. Or you can jump to this screen directly.
Under the "SSH keys" section, choose the "Add SSH Key" button. You'll see a dialog that looks like this:
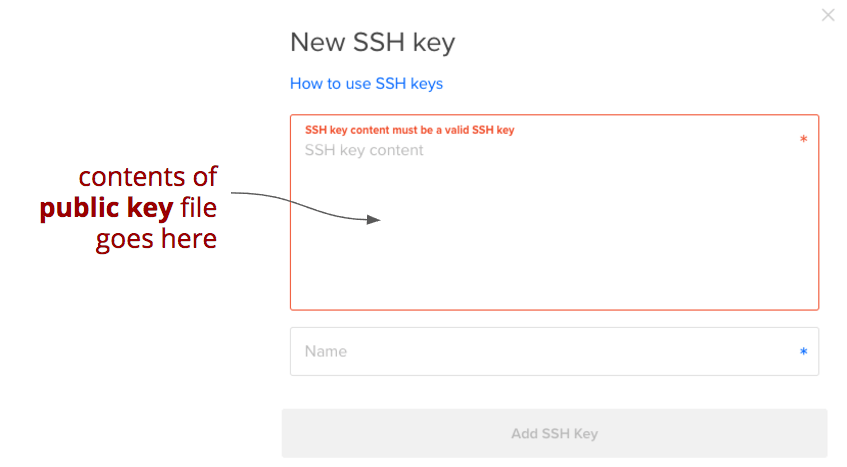
You need to copy the contents of your public key (not your private key) into the first box. By default, the public key is stored in the file ~/.ssh/id_rsa.pub. You can open that in your favorite text editor, or you can just dump it to your terminal using this command:
cat ~/.ssh/id_rsa.pubCopy the contents of that file to your clipboard and paste it into the large box labeled "SSH key content." If you're on a Mac, you can copy it to the clipboard from the terminal using this command
# MacOS only
cat ~/.ssh/id_rsa.pub | pbcopy
On Windows, pipe the output to the clip command instead:
# Windows only
cat ~/.ssh/id_rsa.pub | clip
On Linux you can install and pipe the output to the xclip command:
# Linux only
sudo apt-get install -y xclip
cat ~/.ssh/id_rsa.pub | xclip -selection c
After you paste the contents of the file, enter a name in the second box that describes the computer you are currently using (e.g., "Laptop" or "Home PC"). Since the private key will remain on this computer only, you should use something that identifies this particular computer.
You can add multiple SSH keys to your account, one for each computer you use. When you create a droplet, you can add all of the registered public keys to the new droplet, so that you can connect to it from any of your computers.
Creating a Droplet
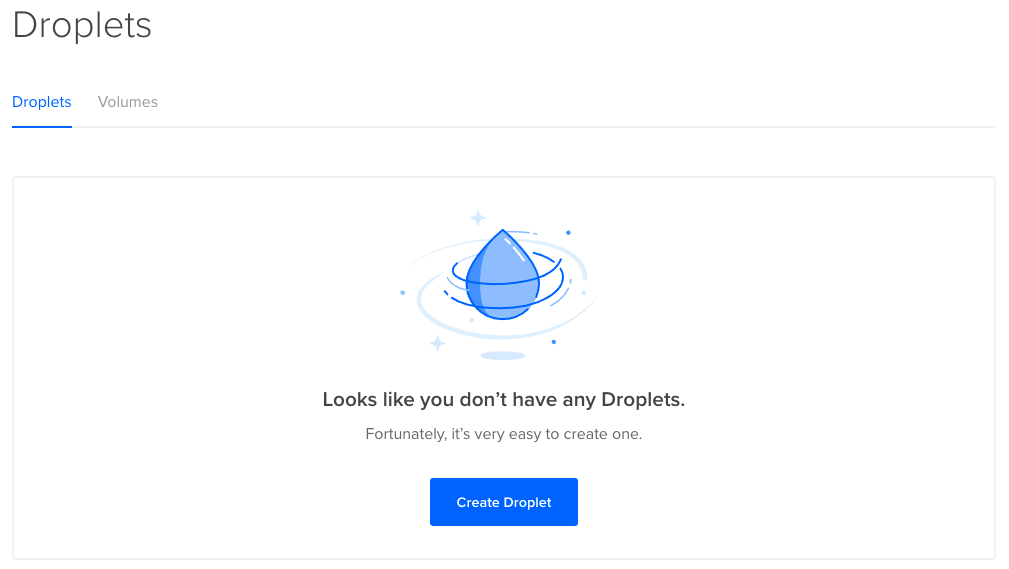
Return to your Droplets list, which will be empty. Click on the big blue button labeled "Create Droplet":
DigitalOcean has several pre-built images you can use for these droplets, including all the commonly-used Linux distros. But if you want to run a Docker container, there's a special "One-Click app" that already has Docker pre-installed on an Ubuntu Long-Term Support (LTS) distro. The specific version numbers vary over time, but it will be called something like "Docker x.x.x-ce on x.x." In the screen shot below, it's highlighted in red:
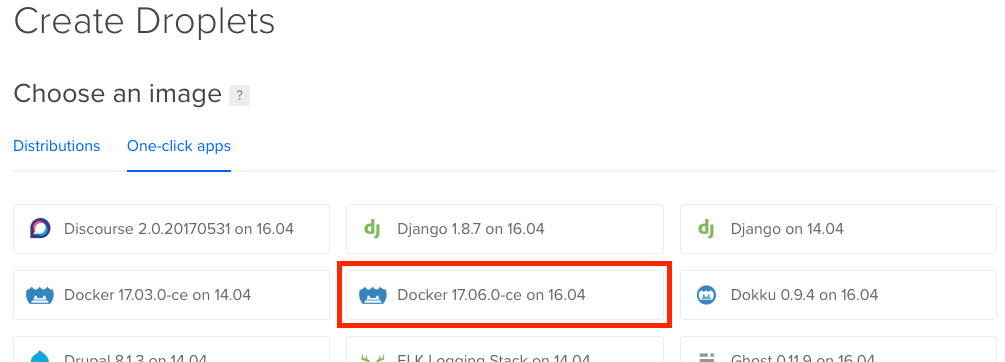
You can of course choose any base Linux distro and install Docker yourself, but this one-click app a convenient way to get up-and-running quickly.
After selecting the image, the next section of the page lets you choose the size of your VM. It will default to selecting the $20/month VM, so make sure you select the cheapest one instead for this tutorial.
You don't need any additional block storage, so you can skip the next section. The following section lets you choose which data center you want your VM to run in. You should choose a data center that is geographically close to your target users and/or yourself. Although the Web often feels instantaneous, geography still matters: a few hundred milliseconds of extra latency can become noticeable if your application makes a lot of requests.
You can also skip the Additional Options section for now. This allows you to add various options like IPv6 support, automated backups, monitoring, and private networking.
The following section allows you to select the SSH Key you registered in the previous section. Choose the SSH key(s) you registered, or you can register a new one if you skipped that previous section. Adding SSH keys to your droplet is a very good idea: your new droplet will be accessible only to you, as only you have the associated private key. If you don't add an SSH key, DigitalOcean will generate a random root user password and send it to you via email. Because email is not a terribly secure medium, it's best to use SSH keys instead.
In the final section you can adjust the number of droplets you are creating (leave at 1 for now) and override the host name that DigitalOcean generated for you (you can leave it as is for now). Click the big "Create" button to create your droplet.
Connecting to Your Droplet
You should see your new droplet in your droplets list, and once it says that the droplet is ready, copy the droplet's IP address to your clipboard. Then in a terminal window use this command to connect to it, replacing ip-address with your droplet's IP address:
ssh root@ip-addressYou may see a message that the host is not yet in your known hosts list, and you can enter yes to add it to that list. You should then see a new prompt, which is a new bash shell running on your new droplet. You can now type commands as if you were directly connected to that droplet. Everything you type will be sent to the server and executed there.
NOTE: if the ssh connection times out, give it a minute and try again. Sometimes it takes a minute for the ssh server on a brand-new droplet to be ready for new connections.
Verifying the Firewall
The firewall should be enabled by default, but to verify, enter this command:
ufw statusThe ufw command is short for "uncomplicated firewall," and the status subcommand displays the firewall's current status. If it reports a status of "active" you are good to go. If it reports that the firewall is not enabled, you can enable it using these commands:
ufw allow OpenSSH
ufw enable
Use ufw status one more time to ensure that the firewall is now active.
Running Your Docker Containers
Docker should already be pre-installed, so to run any Docker container, simply use the docker run command that was discussed in the Docker tutorial. For example, to run your example web site container image you built during that tutorial, use this command, replacing "your-dockerhub-name" with your Docker Hub name:
docker run -d -p 80:80 --name exsite your-dockerhub-name/examplewebsiteDocker will automatically open any published ports on the firewall, so your website should now be live on the Web. You can test it by requesting the URL http://ip-address where ip-address is the IP address of your droplet.
Executing Scripts on Your Droplet
Running a single Docker container is easily done using the steps above, but when you need to run multiple containers, providing lots of command-line flags, it's better practice to put those docker run commands into a bash script that can you run on your droplet. This script can also include the necessary docker pull and docker rm -f commands to upgrade and run new versions of your containers.
You can keep this bash script in your source code repository, yet run it on your droplet using ssh. For example, say you had a script named upgrade-server.sh that looks something like this:
# pull most current version of example web site container image
docker pull your-dockerhub-name/examplewebsite

# stop and remove current container instance
docker rm -f exsite

# run instance of newly-updated container image
docker run -d -p 80:80 --name exsite your-dockerhub-name/examplewebsite
These commands need to be executed on the server, not on our local dev machine. We could copy this script file to the server, ssh into the server, and then execute the script. Or we could just ask ssh to run this script on the server in one operation:
ssh root@$ip-address 'bash -s' < upgrade-server.shThe first part of this ssh command will look familiar, but what follows the user name and network address is a command you want to run on the server once ssh is connected. That command is bash -s, which runs an instance of the bash shell, telling it to execute the script it receives from standard input. The < upgrade-server.sh part redirects standard input to read the contents of the upgrade-server.sh file, so bash will execute everything in that file on the server.
When executing ssh this way, you don't get an interactive terminal on the server. Instead it connects to your server, executes the script, and disconnects, returning you to the command prompt on your local machine.
To do a full deployment, you can write another script called deploy.sh that combines the ssh command above with a docker push:
# push the most recently-built container image to Docker Hub
docker push your-dockerhub-name/examplewebsite

# execute the upgrade-server.sh script on our server
# the -oStrictHostKeyChecking=no skips the prompt
# about adding the host to the list of known hosts
# so that this script doesn't get interrupted if the
# server's IP/hostname is new to us
ssh -oStrictHostKeyChecking=no root@$ip-address 'bash -s' < upgrade-server.sh
Windows Users: keep in mind that Windows and Unix-based systems (such as Linux) use different byte sequences for line endings in text files, so any Bash script you run on a Linux server via
sshmust be saved using Unix-style line endings. On Windows each line in a text file typically ends with the byte sequence0x0D 0x0A, which is Carriage Return (CR) followed by Line Feed (LF), often expressed in code as\r\n. On Unix each line ends with just0x0A(LF or\n). If you try to execute a bash script that has Windows-style line endings on a Linux server viassh, the Bash shell on the Linux side won't interpret the line endings correctly, and will generate all kinds of really strange errors.Thankfully, all code editors will let you override the default line endings used for a given file, so you can tell your editor to use only LF for bash scripts you intend to run on your Linux server. In Visual Studio Code, click on the
CRLFtext in the blue status bar at the bottom of the window, chooseLFfrom the popup list shown at the top of the window, and save the file to convert the line endings. Editors should recognize the line endings used for a given file when you load it, and preserve those line endings when re-saving.Note that this applies only to scripts that you want to execute on a Linux server. Any Bash script you intend to execute locally on your Windows development machine can have Windows-style line endings.
Associating a Domain Name
If you want to associate a domain name you've purchased with your DigitalOcean droplet refer to their excellent How to Set Up a Host Name with DigitalOcean tutorial. The Domain Name Server fields on your domain registrar may be somewhat difficult to find, but every registrar should let you set those.
Script It with the DigitalOcean CLI
The DigitalOcean UI is actually just a simple web client that uses their public API to do all of the work. You can use that API from your own programs, but there's also a handy CLI you can use from bash scripts. This CLI is called doctl, and it's written in Go!
If you have Go installed, use go get to download and install doctl:
go get github.com/digitalocean/doctl/cmd/doctlTo verify the installation, run doctl version. If you get a version number, all is OK. If you get a command not found error, something went wrong. Ensure you have Go intalled and that you setup your Go Workspace correctly.
The doctl CLI uses the public API, so you must first generate an access token for your account, and then register that token with the tool using this command:
doctl auth initYou can now use doctl to do anything you could have done through DigitalOcean's User Interface. For example, to list your current droplets, use this command:
doctl compute droplet listTo list your registered SSH keys, you can use this command:
doctl compute ssh-key listTo create a new droplet from the Docker on Ubuntu image, you can use a command like this:
doctl compute droplet create my-droplet-name \
--image docker-16-04 \
--region sfo2 \
--size s-1vcpu-1gb \
--ssh-keys ... ssh key fingerprint from: doctl compute ssh-key list ... \
--wait
The best documentation for this CLI is actually in the tool itself. Use doctl help to list all of the available subcommands, and if you want help with any particular subcommand, add the subcommand name after doctl help (for example, doctl help compute). You can keep going to see options for final commands: for example doctl help compute droplet create.
Using this tool, you can easily write bash scripts to create droplets and manage domains.
Declare it Using Terraform
Another popular option for automating the creation of VMs is Hashicorp's Terraform. This tool allows you to declare what sort of cloud resources you want, and it handles detecting which already exist and which need to be created. It also works with multiple cloud providers (DigitalOcean, AWS, Google Cloud, etc). See their Getting Started Guide to learn more.