One of the reasons that HTTP scales so well is that it is stateless: there is no data tied to the network socket connection that is accessible during subsequent requests on the same socket. This is in contrast to protocols like FTP, where you can reset the current directory you are viewing on the server, and subsequent requests are processed according to that setting. As you might expect, if you have to maintain state on the socket between requests, then all requests from a given client must be sent to the same server across the same socket connection. This limits your ability to scale up, as clients are pegged to a particular server for the duration of the conversation.
Because HTTP is stateless, requests from all clients can be distributed evenly among several servers via what's known as a load balancer. A load balancer is a simple HTTP server that sits between all the clients and your array of actual servers. Clients send all of their requests to the load balancer, which in turn distributes them evenly among your servers. But the load balancer is free to send requests from the same client to any of the available servers, even if previous requests had been sent to a different server. This enables the load balancer to evenly distribute the load to fully utilize the available resources. The most popular software-based load balancer is NGINX, the same HTTP server you used when learning Docker.
But this stateless quality of HTTP poses a problem when it comes to authenticated sessions: how do we allow users to sign-in during one request, and then access protected resources during subsequent requests? How can we know who the current user is during those subsequent requests? How can we introduce some state that is maintained between requests without sacrificing scalability or security?
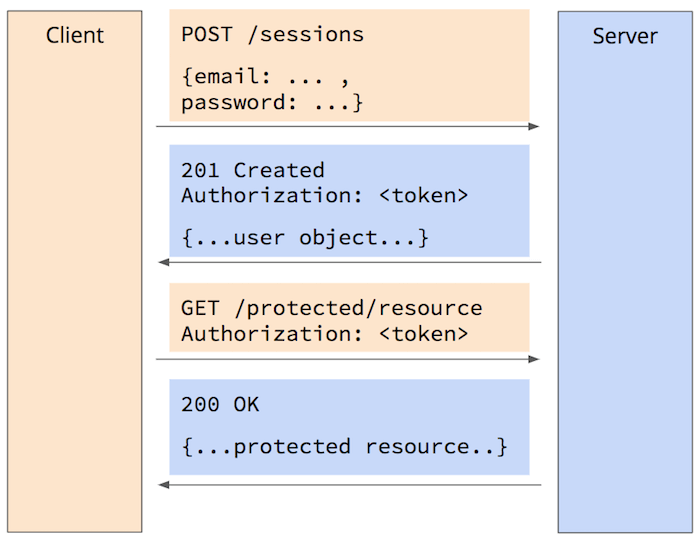
There are a few different ways to accomplish this, but they all use some sort of token string that passed back and forth between the client and server. The token either contains all the data tied to the authenticated session, known as the session state, or is a key to that session state stored in some kind of fast, shared database management system (DBMS), known as the session store. The typical request/response flow looks like this:
Since the token is passed back and forth between the client and server, and since that token grants authenticated access, all communication between the client and the server must be done over an encrypted HTTPS connection. Since clients could try to generate new tokens, or potentially change previously-issued tokens, invalid or modified tokens must be easily detectable by the server and rejected. And in most cases, the tokens should expire after some period of inactivity so that sessions time-out if the user navigates away without signing-out.
NOTE: Before we dive into the details of how we accomplish all of this, I should stress that HTTP was never designed to support stateful sessions. All of the techniques described in the following sections are essentially hacks that developers have created to enable something the protocol was never really designed to do. So if some of this seems unreasonably complicated, that's why.
Session Tokens
The token passed back and forth is just a string, but there are two common options for what this string contains and how it is formatted.
Digitally-Signed Session ID
The most common option is to use a cryptographically-random digitally-signed session ID, encoded into a text-safe format like Base 64, that is a key to the session state managed in a shared session store. Let's break that down a bit:
- Cryptographically-random means that the session ID is an array of unpredictable bytes. Simple random number generators actually produce a predictable series of numbers starting from a seed value, so if you know one number, you can predict all of the subsequent ones. In contrast, cryptographic random generators produce sequences of bytes, and they ensure that subsequent byte patterns are infeasible for an attacker to predict.
- Digitally-signed means that the token contains not only this cryptographically-random session ID, but also a digital signature that the server can use to verify that the ID hasn't been modified since it was signed. Typically we use the first 32 bytes (or so) for the random session ID and the remaining bytes for the digital signature.
- Base 64-encoding is a technique for translating binary bytes that might be well beyond the ASCII range (0-127) into 64 distinct ASCII characters that can be safely transmitted across a text-based protocol like HTTP. Cryptographically-random IDs and digital signatures are both binary data, but HTTP wants text, so we encode the binary data into base 64, and decode it back into binary when we receive the token during subsequent requests.
Since the session ID is just a random value, we use that as a key to the actual session state data stored in some sort of fast, shared DBMS that is accessible only by our web servers (the session store). Because the session state is ephemeral (i.e., it's OK if we lose it during unusual circumstances), this DBMS doesn't need to support ACID transactions or guarantee persistence. In fact, we want a DBMS that prioritizes speed over consistency or durability. The most common choice for this DBMS is redis, though several other proprietary key/value stores are also popular.
The benefits of this approach are as follows:
- Completely Opaque: since the session ID is just random bytes, it reveals nothing about the user or the actual session data.
- Efficient: since the token is just a key to data stored on the server-side, it's relatively small and thus doesn't add a lot of overhead to the request/response messages.
- Secure: the digital signature ensures that attackers can't modify the session ID portion of a legitimate token to hop on to another session. If they do, the signature validation will fail and the server will reject the token. Since the signature depends on a secret that only the server knows, attackers also can't generate new valid tokens.
- Easily Revocable: when the user signs-out, or when an administrator needs to end the session, we can simply delete the session data in the session store. If someone tries to use the token again, the server won't find any data in the session store, and will treat the token as expired.
- Easily Expireable: if we use a session store like redis, we can set an expiry time on the key, after which redis will automatically delete the data. If someone tries to use that token after it expires, the server won't find any data in the session store, and will treat the token as expired.
The main drawback of this approach is that it requires a round-trip between your web server and the session store on each request containing a valid token. This can add some extra latency, but if the session store is on the same local subnet as the web server, or even on the same VM, the amount wouldn't be noticeable. For example, the popular Latency Numbers Every Programmer Should Know shows that a round-trip within the same data center takes about half a millisecond, while a round-trip across the Internet can easily take 150 milliseconds.
The other potential drawback is that the shared session store can become a bottleneck or single point of failure. Although the load balancer can distribute requests amongst an array of web servers, if all those web servers have to request data from one shared session store, you are reintroducing a bottleneck that could threaten scalability. And if that shared session store goes down, your whole system stops working.
To guard against both bottlenecks and single points of failure, DBMSs like redis are designed to run as a cluster of servers that all share data in an "eventually consistent" manner (i.e., changes to one server in the cluster eventually migrate to all other servers, but not necessarily right away). Requests are distributed among the servers in the cluster, and if one server dies, the others continue processing as the cluster restarts the failed server. This eventual consistency is generally fine for session state data, especially if the data doesn't change very often during the session.
JSON Web Tokens (JWTs)
The other option for session tokens are JSON Web Tokens (JWTs), which take the approach of embedding all of the session state into the token itself. A JWT is actually a JSON object containing several fields that is then digitally-signed, base64-encoded, and optionally encrypted if the embedded data contains sensitive information. The promise of JWTs is that they eliminate the need for a shared session store, as all of the session state, plus an expiry time, is embedded in the token itself.
Like the session IDs discussed in the previous section, JWTs are digitally-signed so they enable easy detection of manipulation by an attacker. They are also easily expirable, as they contain timestamps that define a period of time after which the token should be considered expired.
But JWTs have a few significant drawbacks:
- Unrevocable Without Reintroducing a Session Store: since a JWT embeds all of the session data, and since there is no shared session store on the server-side, you can't revoke it without reintroducing some kind of session store. If the user signs-out, or if the administrator needs to forcibly end the session, there is no server-side store that can record that the token is no longer valid. Once your server issues a JWT, it will remain valid until it expires, regardless of what happens in the meantime. And if you do reintroduce a session store for revoked tokens, you might as well use it to store the session state.
- Much Larger on the Wire: since a JWT embeds all of the session data, as opposed to just a session ID, they are noticeably larger. This adds size overhead to every request.
- Must be Encrypted if they Contain Sensitive Info: a session ID is an opaque value that reveals nothing, but a JWT often contains at least a user ID, if not the entire user profile. It may also contain an authorization level or other sensitive information. Since base64-encoding is easily decodable by anyone, a JWT often needs to be encrypted and decrypted as well, which not only increases the size, but also adds time overhead for the decryption on every request.
JWTs work well when you want to provide unrevocable access to your APIs for a particular period of time. But if you need to revoke the token, it's better to use a random, signed session ID with a shared session store.
Digital Signatures with HMAC
Regardless of which approach you use, your session tokens should be digitally-signed so that you can easily detect attempts to fabricate or manipulate them. In case you are unfamiliar with digital signatures, they are essentially an encrypted hash of the data you are signing. To create one, you run the data through a cryptographic hash function, such as SHA256, and then encrypt the result using either symmetric or asymmetric encryption. If you want anyone to verify the signature, you encrypt the hash using an asymmetric algorithm (e.g., RSA) and your private key, so that anyone with your public key can decrypt it again. If the signer is the only agent that needs to verify the signature, then you can use a speedier and less-complex symmetric encryption algorithm with a single key that you keep secret.
Because hash functions always produce the same output for the same input, and produce very different output for a different input, we can use the hash to verify that the data we signed hasn't changed since it was signed. If we decrypt the hash stored in the signature, and then re-hash the current data using the same hash function, we can then compare the two hashes: if they match, we know that the data was not modified since it was signed, and that it was signed by the agent in possession of the encryption key. If they don't match, we know that at least one of those qualities is not true, and we should treat the token as invalid.
Session tokens are signed and verified only by your web server, so we typically use a symmetric approach. A common choice is the Hash-based Message Authentication Code (HMAC) algorithm, which actually mixes a secret key into the data while hashing, so we end up doing the hashing and encryption at the same time. The following diagram shows how the algorithm works: the i_pad and o_pad are well-known constants, key is the secret key, and message is the data you want to sign.
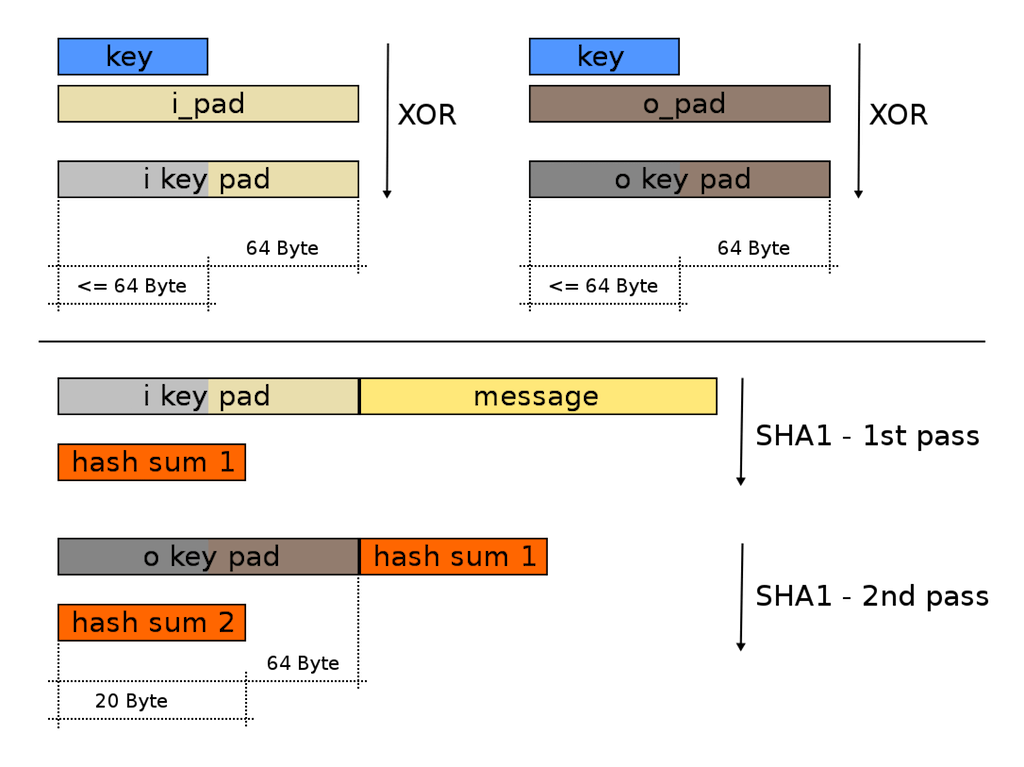
source: Wikipedia
To verify an HMAC signature, we separate the message from the previous signature, hash the message again using the same secret key, and compare the two hashes. If the key or message are different, the hashes won't match, and thus we know the token is invalid.
This prohibits attackers from tweaking a valid session token in hopes of hopping on to another user's session. If the message (session ID or JWT data) has been modified, the new HMAC will be different than the one stored in the token. And the attacker can't resign a modified token because the attacker doesn't know the secret key.
HMAC is implemented in most web programming languages, including Go. Generating an HMAC in Go is quite simple:
package main

import (
    "crypto/hmac"
    "crypto/sha256"
    "fmt"
)

func main() {
    message := []byte("message you want to sign")
    key := []byte("my secret key")

    //create a new HMAC hasher
    h := hmac.New(sha256.New, key)

    //write the message into it
    h.Write(message)

    //calculate the HMAC signature
    signature := h.Sum(nil)
    fmt.Println(signature)
}The hmac.New() method creates a new object that implements hash.Hash, which is Go's standard interface for hashing algorithms. That interface is also a writable stream, so you can call .Write() multiple times to add chunks of data to the algorithm at a time. This allows you to sign very large amounts of data (e.g., a large video file) without having to buffer all of that in memory at once. To calculate the final hash, use the .Sum() method passing nil as the first parameter.
Exchanging Session Tokens
Now that we know how to create and validate session tokens, the next question is how should we send them back and forth between the client and server? There are two primary options here as well: cookies, or another HTTP header plus local storage. Each approach has its own strengths and weaknesses, though the latter one is becoming more standard.
Cookies
Early on in the history of the Web, developers desired a way to know that a given request was coming from the same computer as a previous request. Since clients might be behind network proxies the source IP address wasn't guaranteed to be unique, so the browser and server vendors devised a mechanism for automatically sending a bit of data back and forth between the browser and the server. This kind of data was already known as a "magic cookie" in other networking applications, so the browser vendors borrowed the term but shortened it to just "cookie."
If a server wants to drop a cookie to a browser, it simply returns a Set-Cookie header in the response. The browser dutifully holds on to the value of that header, and includes it as the Cookie header in all subsequent requests to the same origin. Simple, but very handy, as it requires no user intervention. Of course, there's also no disclosure that this is happening, which prompted some to view this as a privacy violation.
Cookies were quickly adopted by marketers for tracking users as they moved around a site, and because any page can include an image served from another origin, companies sprung up who could track users across multiple web sites, as long as those sites include a 1 pixel transparent image on their pages. Users can't see the image, but the browser nevertheless requests it, and sends all cookies associated with that origin in the Cookie header.
Web developers realized they could also use this mechanism for session tokens. After sign-up/in, web servers can include a Set-Cookie header in the response with the session token as the value, and it will be sent with all subsequent requests via the Cookie header. Since the browser manages these headers automatically, no client-side JavaScript was required to make it work.
This all worked famously until clever hackers realized they could take advantage of this automatic behavior. Suppose a site like a bank had a web form to transfer funds between accounts, and suppose many users of that bank's web site remain signed-in for long periods of time. If the attacker could lure a signed-in user to the attacker's web page, that page could contain a similar form, with the same target URL, but pre-populated to transfer the money to the attacker's account. A little JavaScript could then submit the form as soon as the page loads. The browser would then send a Cookie header in the request containing the user's session token, which would establish the user's session. If the bank isn't careful, it could easily assume the post came from its own web site, and process the request without complaint.
This style of attack is known as a Cross Site Request Forgery (CSRF), and various techniques have been devised to protect against it. One of the options is to simply not use cookies anymore, and many developers are now choosing that approach because it's simpler than the others. Instead, they use another HTTP header (typically Authorization), and a bit of JavaScript to store the session token in local storage.
Authorization Header + Local Storage
To avoid the browser's automatic handling of the Set-Cookie and Cookie headers, many developers are now using the Authorization header instead. Since this is not automatically handled by the browser, it's immune to CSRF attacks, but it also means that you need to include some client-side JavaScript to do the work the browser used to do. But since most contemporary web clients are written as single-page apps that make AJAX request, they already contain quite a bit of JavaScript.
With this approach, the server adds an Authorization header containing the session token to the response after a successful sign-up/in. The client-side JavaScript watches for this, and stores the token in local storage (or just holds it in memory if the session should end as soon as the page unloads). The client-side JavaScript also includes the token in an Authorization header sent with all subsequent AJAX requests. The server can then read the token out of that header, validate it, and reconstitute the session state.
Many sites also support sending this token in a query string parameter or form field value. This is useful when establishing a WebSocket connection from client-side JavaScript, as one can't send custom headers during that request.
Redis as a Session Store
If you use a random, signed session ID, you need to store your session state data in some sort of fast, shared ephemeral DBMS. As noted above, redis is a good option for this, as it's not only extremely fast, but also scalable and fault-tolerant.
Running Redis
Since you now know Docker you can play around with redis by running their Docker container. Since we will eventually want the redis server to be accessible only by our API server, we will also create a private Docker network:
# create new private network named demoRedisNet
docker network create demoRedisNet
# run the redis server in that network (no need to publish ports)
docker run -d --name redisServer --network demoRedisNet redis
When you create a network and run containers within it, those containers can see each other, but nothing running outside of that network can see them nor connect to them. Within the network, each container is given a host name corresponding to its container name, so the host name for our server is now redisServer.
You can now connect to it using the redis CLI, which you can also run interactively from their Docker container:
# run the redis-cli in the same private network
# the host name of the server is the same as its container name
docker run -it --rm --network demoRedisNet redis redis-cli -h redisServer
Here we run the same redis container in the same private network, but we override the entry point command to run redis-cli instead of the redis server process. The -h flag is used to provide the host name of the server the CLI should connect to, and within this private network, the server's host name is the same as its container name.
Core Commands
Redis is bit like a giant hash table in that it stores key and value pairs. You can add a key and associated value to the server, ask for the value given the key, and query the set of keys. But you can also set an expiry time on a key, after which the redis server will automatically delete the key and value for you (very handy for automatic session expiration).
The Redis protocol is very simple and human readable. To add a key/value pair, use the SET command, and to get the value for a key, use the GET command:
redisServer:6379> SET "my key" "my value"
OK
RedisServer:6379> GET "my key"
"my value"
To delete a key and value, use the DEL command:
RedisServer:6379> GET "my key"
"my value"
RedisServer:6379> DEL "my key"
(integer) 1
RedisServer:6379> GET "my key"
(nil)
If you want to add a key/value with an automatic expiration (in seconds), use the SETEX command:
redisServer:6379> SETEX "exp key" 10 "my value"
OK
RedisServer:6379> GET "exp key"
"my value"

# wait 10 seconds...

RedisServer:6379> GET "exp key"
(nil)
Lastly, to list all keys that match a pattern (* matches everything), use the KEYS command:
redisServer:6379> SET "my key" "my value"
OK
redisServer:6379> KEYS *
1) "my key"
If you use a common prefix on related keys (e.g., "sid:" for all session ID keys), it not only keeps them from colliding with other keys you might set, but also allows you to easily select them using that prefix in the pattern:
redisServer:6379> SET "sid:123456" "my value"
OK
redisServer:6379> KEYS "sid:*"
1) "sid:123456"
To exit the CLI, type exit and hit return, or use Ctrl+d or Ctrl+c. Since we used the --rm flag when we ran that container, it will be automatically removed.
To stop and remove the server, use docker rm -f redisServer.
To delete the private network, use docker network rm demoRedisNet.
Redis Client Libraries
Redis is a very popular ephemeral DBMS, so there are client libraries for every web programming language, including Go. The Go redis package provides a type-safe API over redis that is fast and relative easy to use.